Saturday, June 30, 2012

Doing another experiment

There's five things I did so far:
  • Made dangerascend.weebly.com my main page, due to organizing two different blogs at the same time.
  • Moved the Request Topic to dangerascend.weebly.com, since no one really commented in it for new requests, and since there was no commenting, I decided to move it to dangerascend.weebly.com
  • All links to both my blogs are on dangerascend.weebly.com.
  • To get to my weebly page, on the NavBar, I placed "Weebly" next to home.
  • I have also made a Requst Topic Submission page as well, so you can submit your topics there.
Hopefully, this experiment works out.

Wednesday, June 27, 2012

Cardfight!! Vanguard - Deck Discussion: Perfect Raizer


Strategy:
With Perfect Raizer, 4 Raizer is ideal for his Soul, however, if you fight an opponent that knows that, you would think about what cards to ride or not ride, and what cards to call or not call. The faster that you get in some attacks, the better off you will be in facing off against your opponent. It's lead into two stages for the strategy:

Stage 1: First Few Turns:
  • With riding into Grade 1 unit and Grade 2 unit, spread your formation and open up all 3 power lanes with what you have so far. The more lanes you have open, the more damage you can deal to your opponent, because your opponent will think about one thing: Take the hit or Guard. To think about card advantage this early will follow down the road into whether you win or lose in the cardfight.
Stage 2: Perfect Raizer
  • Facing off against a barrage of attacks in the first two turns, you focus in on getting the soul built up for Perfect Raizer. Perfect Raizer's first effect decreases it to a 9000 Power Vanguard Attacker, but with his second effect, for each Raizer in his soul, he gains 3000 Power during your turn. Also, when you ride into Perfect Raizer, you will pull all Raizers in the Rear Guard Circles into your Soul, so Battle Raizer, Turboraizer, Raizer Custom, and High-Powered Raizer Custom would be put into Soul, if they are within your Rear Guard Circles. The last effect really makes your opponent sting, due to the first few turns, because if they took on too much damage, they would have to deal with guarding Perfect Raizer every single turn, until they die.
Power Lane Construction:
With Power Lane construction, this'll help you help drain your opponent's hand a bit faster if the above strategy fails to work. Normally, the Shields are as follows: 5000, 10000, or 0, dealing with what card is used as a Guardian. When this strategy fails to work, you need to consider the following:
  • What Vanguard they are using? 10000 Power, 11000 Power, or 13000 Power.
  • What cards can I use to construct a Power Lane?
  • How often will this work?
I decided to do a revisit on this deck, not only because I tested this deck further, but also test how it varies, so this was added as a back-up power lane, just in case the strategy doesn't work:

Death Metal Droid + Death Army Guy = 20000 Power Lane
Death Metal Droid + Tough Boy = 21000 Power Lane

Back-up Vanguard: 
In case, you do not get Perfect Raizer, you will need a back-up Vanguard to take the stage, which would be Asura Kaiser in this deck.

Asura Kaiser would be the "Standing all units" type of Vanguard, which will let you push for more damage, and set up Perfect Raizer whenever you have it set-up.

Deck List:

Grade 0:
4x Battleraizer (One of them will be Starting Vanguard)
4x Turboraizer
4x Grapplemania
4x Round Girl, Clara

Grade 1:
4x Death Army Guy
3x Twin Blader
3x Tough Boy
3x Raizer Custom

Grade 2:
4x Death Army Lady
4x High-Powered Raizer Custom
3x NGM Prototype

Grade 3:
4x Perfect Raizer
2x Asura Kaiser
4x Death Metal Droid

If you have any comments, thoughts, or questions, leave a comment.

Sunday, June 24, 2012

Cardfight!! Vanguard - Deck Discussion: Guardian of Truth, Lox

Strategy:

Currently, the strategy is getting Guardian of Truth Chain Ride series successfully, then using Guardian of Truth, Lox's ability to give yourself enough to win against your opponent; however that's not the only strategy.

With the retiring concept of Great Nature, we had to use some cards that would benefit from that, so I used another unit or units that can benefit greatly from this, which are listed below:
  • Pencil Squire, Hammsuke
  • Pencil Knight, Hammsuke
  • Pencil Hero, Hammsuke
With those 3 units, if you apply a retire ability to one of them, an ability then activates in the End Phase:
  • [AUTO] [Counterblast(1)] During your end phase, when this unit is placed onto your Drop Zone from the Rear Guard Circle, if you have a <<Great Nature>> Vanguard, you may pay the cost. If you do, search your Deck for up to 1 "Pencil _______, Hammsuke", show it to your opponent, and add it to your Hand, then shuffle your Deck.
So, when they retire, you can add another variant of that same card to your Hand at the End Phase without losing advantage.

Deck List:

Grade 0:
4x Triangle Cobra
4x Ruler Chameleon
4x General Cat
4x Dictionary Goat
Schoolyard Prodigy, Lox (Starting Vanguard)

Grade 1:
4x Bringer of Knowledge, Lox
4x Pencil Squire, Hammsuke
3x Cable Sheep
3x Silver Wolf

Grade 2:
4x Law Official, Lox
4x Pencil Knight, Hammsuke
3x Beaker Holstein

Grade 3:
3x Guardian of Truth, Lox
2x School Hunter, Leopard
3x Pencil Hero, Hammsuke

If you have any questions, comments, or thoughts, leave a comment.

Yu-gi-oh! - Deck Discussion: Book of Spells

Strategy:
Right now, the strategy is as follows:
  1. First, cycling through your deck to get at least a few Spellbook cards within your Graveyard.
  2. Second, if you have Jsti, immediately summon her, attack directly, then use effect to grab Junon and another Spellbook Spell Card from your Deck to your Hand.
  3. Third, if you have Temper, immediately summon him, activate the Spellbook searcher, then tribute Temper for either Empeur or Junon
  4. Use Empeur, if need be, or Junon.
Deck List:


3x Apprentice Magician
Batel of the Spellbooks
2x Breaker the Magical Warrior
3x Empeur the Magical King
3x Jsti the Magical Teacher
3x Junon the Magical Priestess
Lependu the Magical Practitioner
3x Temper the Magical Summoner

Dark Hole
Heavy Storm
3x La Maison the Spellbook Tower
Monster Reborn
2x Mystical Space Typhoon
2x The Alma Spellbook
3x The Grimoire Spellbook
3x The Hygromanteia Spellbook
2x The Necronomican Spellbook
3x The Torah Spellbook

Extra Deck: Focuses in on these two cards:

If you have any rate, fix, thoughts, comments, or discuss, leave a comment.

Friday, June 22, 2012

Cardfight!! Vanguard - Deck Discussion: Goddess of the Full Moon, Tsukuyomi

Strategy:
By focusing in on the Goddess of the Full Moon, Tsukuyomi "Chain Ride" series, you can attempt to stack from the bottom of your Deck to the top of your Deck. If you do so, you can cycle through your Deck, and have the stacked portions of what you need at the top of your Deck.


Win Condition: A typical rule-of-thumb I've noticed is that most Cardfight!! Vanguard players guard enough so that 2 Triggers can get through. This is true in most cases; however, if you are able to stack from the bottom of your Deck to the top of your Deck, most likely, you'll be able to stack into those triggers, which you can hit your opponent dead-on with lots of damage due to this rule-of-thumb.

Typical cycling cards would be Secretary Angel, Faithful Angel, and Oracle Guardian Blue-Eye. The two ways to Soul Charge is Oracle Guardian Red-Eye and Tsukuyomi Chain Ride Series.

Deck List:

Grade 0:
4x Oracle Guardian Nike
4x Psychic Bird
4x Battle Sister Ginger

4x Lozenge Magus
Godhawk, Ichibyoshi (Starting Vanguard)

Grade 1:
4x Goddess of the Crescent Moon, Tsukuyomi
4x Battle Sister Vanilla
3x Battle Sister Chocolat
3x Oracle Guardian Blue-Eye

Grade 2:
4x Goddess of the Half Moon, Tsukuyomi
4x Faithful Angel
3x Oracle Guardian Red-Eye

Grade 3:
3x Goddess of the Full Moon, Tsukuyomi
2x Evil-Eye Princess Euryale
3x Secretary Angel

If you have any questions, comments, or thoughts, leave a comment.

Thursday, June 21, 2012

Technical Difficulties

I've been having overheating issues onto my laptop, unfortunately, so no new posts until that is fixed; however, I can give you a taste of what's to come.
  • Yu-gi-oh! - Breakdown of Crystal Beasts - Part 2
    • This will be what you can use for Rank 3 Xyzs within Crystal Beasts. I'll be going through each Xyz in detail, and remarking whether or not you can use it within your Crystal Beast deck. Most likely, I'll try to cover all Crystal Beasts.
  • Yu-gi-oh! - Breakdown of Crystal Beasts - Part 3
    • This will be what you can use for Rank 4 Xyzs within Crystal Beasts. I'll be going through each Xyz in detail, and remarking whether or not you can use it within your Crystal Beast deck. Most likely, I'll try to cover all Crystal Beasts.
  • Cardfight!! Vanguard - Breakdown of Gold Paladins - Part 1
    • First section of this part is picking out a Starting Vanguard. Second section of this part would be the Grade 0 Breakdown of Gold Paladins.  
  • Gaming - Crystal Saga - Hybrid Holy/Blood Priest - Part 3
    • This section will go into detail on what to use for Level 60 to Level 80 skills.
Anyway, just providing you with an idea on how some future posts will be done.

Sunday, June 17, 2012

Cardfight!! Vanguard - Deck Discussion: Velvet Voice, Raindeer

Strategy:

Mainly, the strategy around Velvet Voice, Raindeer is to focus in on the Grade 3 Drive Checks and get enough hits on your opponent to make them lose; however, there's a way to keep yourself not screwed by multiple Grade 3 Drive Checks, and that is this combination:

Velvet Voice, Raindeer as Vanguard with Rainbow Light, Carine or Girls Rock, Rio as Rear Guard

With the balance set the way that it is, 4 Perfect Guards are required for this deck, since your hand will most likely be clogged by Grade 3s.

Deck List:

Grade 0:
4x Comical Rainie
4x Drive Quartet, Shuplu
4x Drive Quartet, Ressac
4x Drive Quartet, Flows
Bermuda Triangle Cadet Weddell (Starting Vanguard)

Grade 1:
4x Mermaid Idol Erie
4x Mermaid Idol Sedna
4x Pearl Sisters, Perle

Grade 2:
4x Pearl Sisters, Perla
4x Girls Rock, Rio
3x Diva of the Clear Seas, Izumi

Grade 3:
4x Velvet Voice, Raindeer
2x Super Idol, Ceram
4x Rainbow Light, Carine 

If you have any thoughts, questions, or comments, leave a comment.

Saturday, June 16, 2012

Cardfight!! Vanguard - Deck Discussion: Spectral Duke Dragon

Strategy:

Pretty much, you attempt to swarm the field as fast as you can, then go for the kill using Spectral Duke Dragon's Limit Break 4, Counterblast 2.

Several ways to go about this:
  • Ride the Vortimer Chain Ride Sequence, and follow the requirements to use the abilities.
  • Blade Feather Valkyrie boosting a Flash-Edge Valkyrie hitting a Vanguard. (Counterblast 1)
  • Player of the Holy Bow, Viviane Counterblast 1.
With these 3 options, you can swarm the field, and possibly lose a little bit of advantage when you use Spectral Duke Dragon's Limit Break 4, Counterblast 2. If it fails, keep on delivering hits to your opponent, until your opponent reaches 6 damage.

Be very careful when setting up lanes for your units, because you will only have one chance to swarm the field, then be able to do Spectral Duke Dragon's Limit Break 4, Counterblast 2, so timing needs to be perfect to use this build.

Deck List:

Grade 0:
4x Silent Punisher
4x Flame of Victory
4x Falcon Knight of the Azure Sky
4x Elixir Sommelier
Black Dragon Whelp, Vortimer (Starting Vanguard)

Grade 1:
4x Jet Black Vanguard, Vortimer
4x Blade-Feather Valkyrie
3x Holy Shield, Mark
3x Precipice Whirlwind, Sagramore

Grade 2:
4x Knight of the Black Dragon, Vortimer
4x Flash-Edge Valkyrie
3x Player of the Holy Bow, Viviane

Grade 3:
4x Spectral Duke Dragon
4x Satellite Fall Dragon

If you have any questions, comments, or thoughts, leave a comment.

Friday, June 15, 2012

Cardfight!! Vanguard - Deck Discussion: Vajra Emperor, Indra

Strategy:
For this strategy, it's the same strategy as Perfect Raizer, but the power lanes are going to be more powered and the strategy will be more dependant on Stand Triggers.

With attacking your opponent, it'll be split into a three-part strategy:
  • First turn that you can attack, set-up immediately the three power lanes, if possible. For Photon Bomber Wyvern, put it behind Vanguard near immediately, because once your opponent gets up there in damage, you will gain more boosted power from that card; however, since it only boosts the Vanguard lane, you would have to make the Vanguard attack count as much as you can.
  • Second turn, set-up the power lanes to be much stronger than Turn 1, if possible.
  • Remainder of game, you'll have Vajra Emperor, Indra to work with you, and granting you a Critical boost, if you have more than 1 Indra in your Rear Guard Circle. If your opponent focuses in on sending the Rear Guard Vajra Emperor, Indra into your Drop Zone, you move Vajra Emperor, Indra to the back, and focus in on redefining the 3 lanes a bit more. 
Deck List:


Grade 0:
4x Malevolent Djinn
4x Yellow Gem Carbuncle
4x Zephyr Kid, Hayate
4x Demonic Dragon Nymph, Seiobo
Spark Kid Dragoon (Starting Vanguard)

Grade 1:
4x Photon Bomber Wyvern
4x Djinn of the Lightning Spark
3x Red River Dragoon
3x Wyvern Guard Guld

Grade 2:
4x Djinn of the Lightning Flare
4x Bright Lance Dragoon
3x Desert Gunner, Shiden

Grade 3:
4x Vajra Emperor, Indra
4x Djinn of the Lightning Flash

If you have a question, comment, or thought, leave a comment.

Tuesday, June 12, 2012

Cardfight!! Vanguard - Deck Discussion: Ice Prisoner Necromancer, Cocytus

Strategy:

Power Lane, Infinite Resurrection: When you call Ice Prisoner Necromancer, Cocytus, you have option to choose how to set up your power lanes:
  • Hades Steersman: Hades Steersman would be called to a Rear Guard Circle, once you ride Ice Prisoner Necromancer, Cocytus.
  • Deadly Nightmare: If you need to get a booster set-up for a Rear Guard lane, you can do a Soul Blast 2, and call Deadly Nightmare from your Drop Zone to a Rear Guard Circle.
  • Deadly Spirit: If you need an attacker for a Rear Guard lane, you can do a Soul Blast 2, and call Deadly Spirit from your Drop Zone to a Rear Guard Circle.
  • Death Seeker, Thantalos: Best option to call a Rear Guard circle. Once, you land a Direct Attack onto a Vanguard with this card, you can do a Counter Blast 1, and call a unit from your Drop Zone, except "Death Seeker, Thantalos", to a Rear Guard Circle.
More options were opened in BT02; however, by request, I'll be doing two deck variants listed below:
  • BT06 Only Variant
  • BT02 and BT06 Only Variant
Deck List - BT06 Only Variant:

Grade 0:
4x Ghoul Cannonball
4x Hades Steersman
4x Hook-Weilding Zombie
4x Doctor Rogue
1x Captain Nightkid (Starting Vanguard)

Grade 1:
4x Skeleton Colossus
4x Deadly Nightmare
3x Dragon Spirit
3x Ripple Banshee

Grade 2:
4x Skeleton Demon World Knight
4x Deadly Spirit
3x Sea Navigator, Silver

Grade 3:
3x Ice Prisoner Necromancer, Cocytus
2x Deadly Swordmaster
3x Death Seeker, Thanatos

Deck List - BT02 and BT06 Only Variant

Grade 0:
4x Rough Seas Banshee
4x Hades Steersman
4x Hook-Weilding Zombie
4x Doctor Rogue
1x Captain Nightkid (Starting Vanguard)

Grade 1:
4x Skeleton Colossus
4x Samurai Spirit
3x Gust Jinn
3x Deadly Nightmare

Grade 2:
4x Skeleton Demon World Knight
4x Captain Nightmist
3x Deadly Spirit

Grade 3:
3x Ice Prisoner Necromancer, Cocytus
2x King of Demonic Seas, Basskirk
3x Death Seeker, Thanatos

If you have any questions, thoughts, or comments, leave a comment.

Monday, June 11, 2012

Cardfight!! Vanguard - Deck Discussion: Perfect Raizer

Strategy:
With Perfect Raizer, 4 Raizer is ideal for his Soul, however, if you fight an opponent that knows that, you would think about what cards to ride or not ride, and what cards to call or not call. The faster that you get in some attacks, the better off you will be in facing off against your opponent. It's lead into two stages for the strategy:

Stage 1: First Few Turns:
  • With riding into Grade 1 unit and Grade 2 unit, spread your formation and open up all 3 power lanes with what you have so far. The more lanes you have open, the more damage you can deal to your opponent, because your opponent will think about one thing: Take the hit or Guard. To think about card advantage this early will follow down the road into whether you win or lose in the cardfight.
Stage 2: Perfect Raizer
  • Facing off against a barrage of attacks in the first two turns, you focus in on getting the soul built up for Perfect Raizer. Perfect Raizer's first effect decreases it to a 9000 Power Vanguard Attacker, but with his second effect, for each Raizer in his soul, he gains 3000 Power during your turn. Also, when you ride into Perfect Raizer, you will pull all Raizers in the Rear Guard Circles into your Soul, so Battle Raizer, Turboraizer, Raizer Custom, and High-Powered Raizer Custom would be put into Soul, if they are within your Rear Guard Circles. The last effect really makes your opponent sting, due to the first few turns, because if they took on too much damage, they would have to deal with guarding Perfect Raizer every single turn, until they die.
Deck List:

Grade 0:
4x Battle Raizer (One of them will be your Starting Vanguard)
4x Turboraizer
4x Three Minutes
4x Round Girl, Clara (or Wall Boy)

Grade 1:
4x Raizer Custom
4x Death Army Guy
3x Tough Boy
3x Twin Blader

Grade 2:
4x High-Powered Raizer Custom
4x Death Army Lady
3x Magician Girl Kirara

Grade 3:
4x Perfect Raizer
3x Miss Splendor
2x Death Metal Droid

If you have any thoughts, questions, or comments, leave a comment.

Sunday, June 10, 2012

Cardfight!! Vanguard - Breakdown of Nova Grapplers - Part 4

Grade 3 Breakdown:

I will go into more detail by seperating them by Vanguard-Effective units only, of which I will attempt to make a deck of each one. The Vanguard-Effective Unit cards will be listed 3 at a time.


Armored Fairy, Sphira (left) is a 10000 Grade 3 Vanguard unit with an effect listed below:
  • Auto (V/R): (Soul Blast (3)) When this Unit's attack hits, and you have a <<Nova Grappler>> Vanguard, you may pay the cost. If so, draw 1 card.
  • Auto (V): When this Unit is boosted by a <<Nova Grappler>> for that battle, this Unit gains +3000 Power.
If you have it in either, you can do the Soul Blast anytime you want; however, most of the time, you will not have it. Reason why it's a Vanguard Unit to choose from is the second effect, which can set up a 20000 or 21000 Power Lane.

Asura Kaiser (middle) is a 11000 Grade 3 Vanguard unit with an effect listed below:
  • Continuous (V/R): When you don't have other <<Nova Grappler>> Vanguard or Rear Guards, this Unit loses -2000 Power.
  • Auto (V): When this Unit's Drive Check reveals a Grade 3 <<Nova Grappler>> choose 1 of your Rear Guards and Stand it.
If you don't have any other Nova Grappler Vanguard or Rear Guards, then this becomes a 9000 Grade 3 unit. The reason why it's a Vanguard unit is because of the second effect, which can set up 5 attack lanes, if you use Death Army Lady and Death Army Guy.

Beast Deity, Azure Dragon (right) is another 11000 Grade 3 Vanguard unit with an effect listed below:
  • Continuous (V/R): If you have a non <<Nova Grappler>> Vanguard or Rearguard, this unit gets Power -2000.
  • Auto (V): (Select 1 <<Beast Deity Azure Dragon>> in your hand and discard it) When this Unit's attack hits the Vanguard, you can pay the cost. If you do, stand 2 of your Rearguards.
If this was in your Vanguard position, you can set up another attack lane easily by using the effect, if it hits the Vanguard and if you have another Beast Deity, Azure Dragon in your hand.


Gold Rutile (left) is a 10000 Grade 3 Vanguard unit with an effect listed below:
  • Auto (V): When your Rear Guard's attack hits a Vanguard, choose 1 from your Damage Zone and unflip it.
  • Auto (V): (Counter Blast (2)) When this Unit's attack hits a Vanguard, you may pay the cost. If paid, choose 1 of your <<Nova Grappler>> Rear Guards and Stand it.
If you're running a heavy Counterblast deck, you would want to run this card if most of your Rear Guards counterblast.

Mr. Invincible (middle) is a 10000 Grade 3 Vanguard unit with an effect listed below:
  • Auto (V) : During the start of your Main Phase, Soul Charge (1), choose 1 from your Damage Zone and unflip it.
  • Auto (V/R) : (Soul Blast (8), Counter Blast (5)) When this Unit's attack hits, you may pay the cost. If paid, all of your Units stand.
This card would be great for Soul building and Counterblast decks. His last effect can trigger into 5 Attacks, but with a cost of 8 Soul and 5 damage being flipped.

Perfect Raizer (right) is a 11000 Grade 3 Vanguard unit with an effect listed below:
  • Continuous (V/R): If you do not have another "Raizer" Unit other than this card in your Vanguard Circle or Rearguard Circle, this Unit loses -2000 Power.
  • Continuous (V): During your Turn, this Unit gains +3000 Power for each "Raizer" Unit in your Soul.
  • Continuous (V): If you have 4 or more "Raizer" Units in your Soul, this Unit gains +1 Critical.
  • Auto: When this Unit appears in the Vanguard Circle, place all "Raizer" Units you control into your Soul.
If you ever make a Raizer deck, this card would be perfect for you in that deck as the Grade 3 Vanguard unit.


Stern Blaukruger (left) is a 10000 Grade 3 Vanguard unit, and also the last card in the "Chain Ride" Stern Blaukruger series. Stern Blaukruger's effect is listed below:
  • Continuous (V): If you have (Blaukruger) in your Soul, this Unit gains +1000 PWR.
  • Auto (V): (Counter Blast (2), Discard 2 <<Nova Grappler>>'s from your Hand) When this Unit's attack hits a Vanguard, you may pay the cost. If paid, Stand all of your Units on the same column as this Unit, and during that turn, this Unit loses its (Twin Drive!!) ability.
Pretty much, this card will only be used within his own deck.

Top Gun (middle) is a 10000 Grade 3 Vanguard unit with an effect listed below:
  • Auto (V): When a <<Nova Grappler>> Rearguard rests, this Unit gains +1000 Power during this turn.
This unit could be potentially used in a Rear Guard Stand deck, which this card can gain potentially 4000 more power, and only need a 6000 or 7000 Power Booster.

Ultimate Lifeform, Cosmo Lord is a 10000 Grade 3 Vanguard unit with an effect listed below:
  • Activate (V): (Choose 1 of your <<Nova Grappler>> Rearguards, and Rest it) During that turn, this Unit gains +3000 Power.
There's a unit that allows you to stand in the Main Phase after using Ultimate Lifeform, Cosmo Lord's effect, by flipping one card in the Damage Zone.

Then, there's effective units that work in either the Vanguard circle or Rear Guard circles. Those units will be listed 3 at a time.


Death Metal Droid (left) is a 10000 Grade 3 unit with an effect listed below:
  • Auto (V/R): (Counter Blast (1)) When this Unit attacks, you may pay the cost. If paid, during that Battle, this Unit gains +3000 Power.
You'll need a 7000 Power Booster for 20000 Power Lane, or an 8000 Power Booster for 21000 Power Lane.

Brutal Joker (middle) is a 10000 Grade 3 Unit with an effect listed below:
  • Activate (V/R): (Counterblast (2)) During that turn, this Unit gains +4000 Power.
You'll need a 6000 Power Booster for 20000 Power Lane, or a 7000 Power Booster for 21000 Power Lane.

Lion Heat (right) is a 10000 Grade 3 Unit with an effect listed below:
  • Auto (V) (Counter Blast (2)) When this Unit's attack hits a Vanguard, you may pay the cost. If paid, choose 1 of your <<Nova Grappler>> Rear Guards and stand it.
  • Auto (R) (Counter Blast (2)) When this Unit's attack hits a Vanguard, you may pay the cost. If paid, choose 1 of your Grade 1 or lower <<Nova Grappler>> Rear Guards and stand it.
If you plan on reusing a Nova Grappler booster than turn, you would attempt to hit the Vanguard with this unit. Great for Heavy Counterblasting decks, and great for rushing your opponent.


Miss Splendor (left) is a 10000 Grade 3 unit with an effect listed below:
  • Auto (V/R): When this Unit attacks, your opponent cannot Intercept during this Battle.
This unit will be great for giving Triggers to, because your opponent will have restricted options in Guarding.

Moai the Great (middle) is a 10000 Grade 3 unit with an effect listed below:
  • Auto (V/R): When this unit is boosted by a <<Nova Grappler>> unit, this unit gains Power +2000 until the end of that battle.
You'll need an 8000 Power Booster for 20000 Power Lane, or a 9000 Power Booster for 21000 Power Lane.

Muscle Hercules (right) is a 10000 Grade 3 unit with an effect listed below:
  • Auto: When this unit is placed on a Vanguard Circle or Rearguard Circle, if you have a <<Nova Grappler>> Vanguard, choose a card from your damage zone, and flip it face-up.
Great for Heavy Counterblast decks. It'll depend heavily on what you use, so this card may or may not be used within a Heavy Counterblast deck.

Friday, June 8, 2012

Cardfight!! Vanguard - Breakdown of Nova Grapplers - Part 3

Grade 2 Breakdown:
For Grade 2s, there's a generic 10000 Power beatstick without an effect. For Nova Grapplers, the generic 10000 Power beatstick would be King of Sword.


Now, there's also a S Special Interceptor that can grant 10000 Shield, once it intercepts. For Nova Grapplers, it would be NGM Prototype.


Typical S Special Interceptor has an effect listed below:
  • Auto: When this Unit intercepts, and you have a «Insert Clan Name Here» Vanguard, during that battle, this Unit's Shield gains +5000.
For now, there's no category to put the remainder of the Grade 2s in, so I'll elaborate the cards, two at a time.


Beast Deity, Black Tortoise (left) is a 8000 Power Grade 2 Attacker with an effect shown below:
  • Auto (V/R): When this Unit's Attack hits the Vanguard, if you have a <<Nova Grappler>> Vanguard, you look at up to the top 5 cards of your Deck, look for up to 1 "Beast Deity, Azure Dragon", show it to your opponent, add it to your hand, then place the remaining cards on the bottom of your Deck in any order that you like.
It is a nice way to search out Beast Deity, Azure Dragon, but at the same time, you can look into your Deck and stack from the bottom to the top of your Deck, so you can go trigger happy, late game.

Blaukruger (right) is a 9000 Power Grade 2 Attack and it is part of the Stern Blaukruger "Chain Ride" series with an effect shown below:
  • Continuous (V): When you have (Blaupanzer) in your Soul, this Unit gains +1000 Power.
  • Auto (V): When this Unit's attack hits a Vanguard, unflip 1 Damage.
If you ride Blaupanzer onto Blaujunger, you can get Blaukruger from your Deck and add it to your hand.


Boomerang Thrower (left) is a 9000 Power Grade 2 Attacker with an effect shown below:
  • Auto: When you Ride this card atop a <<Nova Grappler>>, during that turn, this Unit gains "Continuous (Vanguard): This Unit can select an opponent's Unit in the opponent's Back Row to battle with."
This card wouldn't be really used except for a 9000 generic Power Attacker, which we already have King of Sword.

Brutal Jack (right) is a 11000 Power Grade 2 Attacker with an effect shown below:
  • Continuous (V/R): Restraint (This Unit cannot attack)
  • Activate (V/R): (Counter Blast (1)) During that turn this Unit loses its (Restraint) .
  • Auto (V): When this Unit is boosted by a «Nova Grappler» for that battle, this Unit gains +5000.
With his Power, you can utilize him to get over a Grade 3 if need be, by itself; however the drawback is that you have to do a Counter Blast 1 to do it.


Cup Bowler (left) is another 9000 Grade 2 Attacker with an effect listed below:
  • Auto:(V) : This unit gains +1000 Power for the turn for each «Nova Grappler» Rear Guard that goes into Rest Position.
This card wouldn't be really used except for a 9000 generic Power Attacker, which we already have King of Sword.

Death Army Lady (right) is another 9000 Grade 2 Attacker with an effect listed below:
  • Auto (R): When a Grade 3 «Nova Grappler» is revealed by your Vanguard's Drive Check, Stand this Unit.
Another good way to rush your opponent is to put these cards along with Death Army Guy to set up a standing power lane if you drive check a Grade 3. If you combine this with Asura Kaiser, you can have up to 5 attacks per turn, easily.


Eisenkugel (left) is a 10000 Grade 2 Attacker, with an effect listed below:
  • Continuous (V/R): When you don't have (Stern Blaukruger) or (Blaukruger) on the Vanguard Circle, this Unit loses -5000 Power.
  • Auto (V/R): When this Unit attacks, during that battle, this Unit gains +2000 Power.
If you focus away from the Chain Ride Stern Blaukruger series, then don't use this card. Otherwise, you can give this card a try and see if it works for you.

High-Powered Raizer Custom (right) is a 8000 Grade 2 Attacker, with an effect listed below:
  • Continuous (V/R): During your Turn, if your "Battle Raizer" is in the Same Column as this card, this unit gains +8000 Power.
Outside of using it along with Battle Raizer, it's a 8000 vanilla beatstick, of which in some cases, is not worthwhile. If you want to give it a try in a Raizer deck, go ahead. Otherwise, there's better cards to pick over this card.


Hungry Dumpty is a 9000 Grade 2 Attacker with an effect listed below:
  • Auto : When this Unit is called as a Rear Guard, and you have a «Nova Grappler» Vanguard, unflip 1 card from the Damage Zone.
Great for Heavy Counterblast decks.

Kungfu Kid, Bolter is a 8000 Grade 2 Attacker with an effect listed below:
  • Auto (V/R): When this Unit attacks, and you have more Rearguards than your Opponent, during that battle, this Unit gains +3000 Power.
For this card, it'll depend on future releases and how consistent decks are with pulling a 9000 Grade 1 Booster, which can lead to a 20000 Power Lane.


Magician Girl, Kirara is a 9000 Grade 2 Attacker with an effect listed below:
  • Auto (V/R): (Counterblast (2)) When this Unit's attack hits, and you have a «Nova Grappler» Vanguard, you may pay the cost. If paid, draw 1 card.
For Counterblasting, if you want more cards drawn, you use this card. Otherwise, you'll pick something else.

Marvelous Hani is a 7000 Grade 2 Attacker with an effect listed below:
  • Auto (V/R): When this Unit's attack hits a Vanguard, if you have 4 or more other <<Nova Grappler>> Rearguards, draw 1 card.
This would be used instead of Magician Girl, Kirara, if the deck isn't focused in on Counterblasting.


Street Bouncer is a 8000 Grade 2 Attacker with an effect listed below:
  • Auto: (Rest this card and select 1 of your <<Nova Grappler>> in the Same Column, except this Unit, and Rest it.) When this Unit appears in the Rearguard Circle, and you have a <<Nova Grappler>> Vanguard, you can pay the cost. if you do, draw 1 card.
With shutting off a Power Lane, you can draw a card, which is not that good in wasting your opponent's resources. There isn't much point for this card, since there's better choices instead of this card.

Super Electromagnetic Lifestorm, Storm is a 9000 Grade 2 Attacker with an effect listed below:
  • Auto (V/R): When this Unit's attack hits a Vanguard, and you have a «Nova Grappler» Vanguard, unflip 1 card in your Damage Zone.
Great for Heavy Counterblasting decks.  It'll depend on preference of what you want: Hungry Dumpty or Super Electromagnetic Lifestorm, Storm.

Thursday, June 7, 2012

Cardfight!! Vanguard - Deck Discussion: Incandescent Lion, Blond Ezel

Strategy:
Frontal Strategy: Get Incandescent Lion, Blond Ezel out as fast as you can. With this strategy, you can fight your opponent with a set-up power lane with a Twin Drive Check, while your opponent still fights with a Grade 1 or Grade 2 Vanguard for the time being.

Secondary Strategy: Limit Break(4), Counterblast (2) Once, you reach 4 damage (or 5 if you get hit by a Critical Trigger), you can go to break your opponent with a strategy listed below:
  • Immediately when you reach 4 damage, you can use Incandescent Lion, Blond Ezel to call the top card of your Deck to a Rear Guard Zone. Then, use that power to strike your opponent quickly and cleanly.
  • Next turn, if your opponent survives the assault, you can ride into Spectral Duke Dragon and use that Limit Break when you attack the Vanguard, of which you can do 4 attacks.
  • If he still survives, if you have enough resources, use Mage of Calamity, Tripp and Heal Triggers to have 2 more unflipped damage in the Damage Zone and use Spectral Duke Dragon's Counterblast to open up 4 attacks again.
Deck List:

Grade 0:
4x Flames of Victory
4x Weapons Dealer, Gwydion
4x Falcon Knight of the Azure Sky
4x Elixir Sommelier
Crimson Lion Cub, Kyrph (Starting Vanguard)

Grade 1:
4x Knight of Elegant Skills, Gareth
4x Player of the Holy Axe, Nimue
3x Halo Shield, Mark
3x Precipice Whirlwind, Sagramore

Grade 2:
4x Knight of Superior Skills, Beaumains
4x Mage of Calamity, Tripp
3x Providence Strategist

Grade 3:
3x Incandescent Lion, Blond Ezel
3x Spectral Duke Dragon
2x Gigantech Destroyer

If you have questions, thoughts, or comments, leave a comment.

Tuesday, June 5, 2012

Cardfight!! Vanguard - Deck Discussion: Stern Blaukruger

Strategy:
The main strategy is to Chain Ride into Stern Blaukruger. The easiest way to get through to the Chain Ride process is to search through your entire deck for another component, hence Beast Deity, Azure Dragon became a necessary part for a Stern Blaukruger deck. Even when you already have Stern Blaukruger as your Vanguard, once you activate the ability, you can discard 2 Beast Deity, Azure Dragon to stand the VG Power Lane and attack again.

The reason why you search out for Beast Deity, Azure Dragon is to dump for Blaupanzer, and you can use it as an additional card when you can discard it for Stern Blaukruger, where you reduce the cost of what you need by whatever you search out from your Deck.

Also, it is ideal to Chain Ride successfully each time you play this deck.

Deck List:

Grade 0:
4x Shining Lady
4x The Gong
4x Three Minutes
4x Wall Boy (or Ring Girl, Clara)
Blaujunger (Starting Vanguard)

Grade 1:
4x Blaupanzer
4x Beast Deity, Scarlet Bird
3x Dancing Wolf
3x Twin Blader

Grade 2:
4x Blaukruger
4x Beast Deity, Black Tortoise
3x NGM Prototype

Grade 3:
4x Stern Blaukruger
4x Beast Deity, Azure Dragon

If you have any questions, thoughts, or comments, leave a comment.

Monday, June 4, 2012

Yu-gi-oh! - Deck Discussion: Crystal Beasts

Strategy:
Right now, currently, the strategy is as follows:
  • Step 1: Fill your Spell and Trap Zones with Crystal Beasts as best as you can.
    • There's several Spell and Trap Zone Destroyers, but it's nothing much to worry about since currently players in this game do not play face-downs enough often. Once, your opponent catches on to what you are doing, he'll use the Spell and Trap Zone Destroyers to wreck your Crystal Beasts instead of what you have face-down.
  • Step 2: Special Summon Crystal Beast Ruby Carbuncle.
    • By Special Summoning this card, you can fill your Monster Zones with the Crystal Beasts you put in your Spell and Trap Zones.
  • Step 3: Exceed Summoning into as many Xyzs as you can.
    • By doing Step 2, you can go into Step 3 near immediately. If you have a broad enough Extra Deck, you can convert to any situation, and fight off nearly any opponent.
  • Step 4: Push to finish your opponent.
    • Thanks to the set-up Step 3 provides, you can push for finishing your opponent as fast as you can before your opponent can rebound.

Sample Deck List:


2x Crystal Beast Amber Mammoth
2x Crystal Beast Amethyst Cat
2x Crystal Beast Cobalt Eagle
2x Crystal Beast Emerald Tortoise
2x Crystal Beast Ruby Carbuncle
3x Crystal Beast Sapphire Pegasus
2x Crystal Beast Topaz Tiger
2x Rainbow Dragon
2x Summoner Monk

3x Ancient City - Rainbow Ruins
3x Crystal Abundance
3x Crystal Beacon
3x Crystal Blessing
3x Crystal Release
Dark Hole
Monster Reborn
2x Terraforming

2x Torrential Tribute


Extra Deck:
Daigusto Emeral
Lavalval Chain
Maestroke the Symphony Djinn
Melomelody the Brass Djinn
Muzurhythm the String Djinn
Number 16: Shock Master
Number 20: Giga-Brilliant
Number 32: Shark Drake
Number 34: Terror-Byte
Number 39: Utopia
Number 50: Black Corn
OOPArts' Crystal Xenoform
Steelswarm Roach
Temtempo the Percussion Djinn
Vylon Disigma

Card Choices:
  • The less traps that you have, the better that you will play this deck. Reason being is that Crystal Beasts take up Spell and Trap Cards, and it's unnecessary to use the Crystal Beasts Trap Card Support, because when you use it, you have already killed your opponent.
  • The Spell Line-up is slightly different from what I had before, since I have a habit of pulling 5 Crystal Beasts into the Spell and Trap Zone, and I need protection from whatever the opponent has planned, so Ancient City - Rainbow Ruins and Terraforming were put in, and they fit in well.
  • I would never plan on putting in other "staple" cards in the deck, because it'll lose the speed feel that it has currently, and once you slow it down, your opponent can counteract much quickly that when you can pull it off in Turn 1, Turn 2, or Turn 3.
  • Rainbow Dragon is in there for a 4000 attack beatstick that can drop itself on the Field easily every time I go through my deck for the necessary pieces to summon Rainbow Dragon.
Other than that, it's nearly the same as before. Anyway, rate, comment, fix, thoughts, and discuss.


Saturday, June 2, 2012

Yu-gi-oh! - Breakdown of Crystal Beasts - Part 1

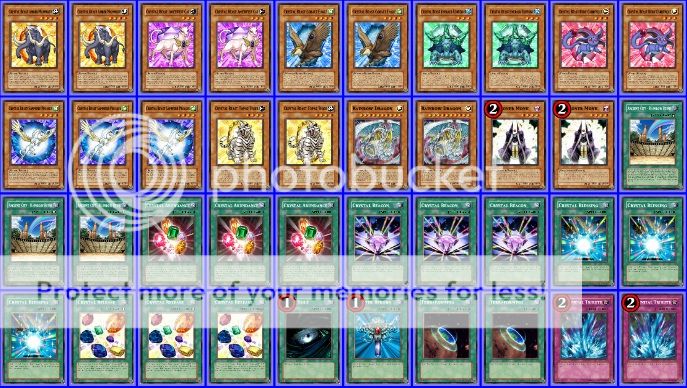
For Crystal Beasts, it's centered around 7 monsters for their archetype alone and 8 cards if you include Rainbow Dragon. Those 8 cards are shown below:


The following cards are as follows:
  • Top Left - Crystal Beast Amber Mammoth
  • Top Middle - Crystal Beast Amethyst Cat
  • Top Right - Crystal Beast Cobalt Eagle
  • Center Left - Crystal Beast Emerald Tortoise
  • Center Right - Crystal Beast Ruby Carbuncle
  • Bottom Left - Crystal Beast Sapphire Pegasus
  • Bottom Middle - Crystal Beast Topaz Tiger
  • Bottom Right - Rainbow Dragon
For the monster support, these cards would have effects related to Crystal Beasts:


Rainbow Dragon (bottom right) is the main card from the Crystal Beast series that provides it with some power. It's a Level 10 Light Monster with 4000 Attack and 0 Defense; however, the reason why it is not mostly used is because of Rainbow Dragon's effect:
  • Cannot be Normal Summoned or Set. Must be Special Summoned (from your hand) by having 7 "Crystal Beast" cards with different names on your field or in your Graveyard, and cannot be Special Summoned by other ways. This card cannot activate its effects the turn it is Special Summoned.
    • During either player's turn: You can send all "Crystal Beast" monsters you control to the Graveyard; this card gains 1000 ATK for each card sent.
    • You can banish all "Crystal Beast" monsters in your Graveyard; shuffle all cards on the field into the Decks.
With Rainbow Dragon's first effect, you would have to send all Crystal Beasts you control to the Graveyard to have it gain 1000 ATK only for it to be Magic Cylinder'd or Dimensional Prison'd. For Rainbow Dragon's second effect, it's not worth it because you would have to banish all Crystal Beasts monsters that are in your Graveyard to bounce everything back into the Deck. Good effect, but due to the heavy cost of banishing all Crystal Beast monsters, you wouldn't be able to summon Rainbow Dragon again until you are able to send 7 different Crystal Beast monsters to the Graveyard. The reason why it should be added though is to run over high Attack monsters and have your opponent waste a card or two to get rid of it.

Crystal Beast Amber Mammoth (top left) is one of the support cards for Crystal Beasts in the Monster Card Zones. It is a Level 4 Earth Monster with 1700 Attack and 1600 Defesne; however, his effect would be used in rare cases. Crystal Beast Amber Mammoth's effect is as follows:
  • When another face-up "Crystal Beast" monster you control is targeted for an attack: You can make this card the attack target instead. If this face-up card is destroyed while it is in a Monster Card Zone, you can place it face-up in your Spell & Trap Card Zone as a Continuous Spell Card, instead of sending it to the Graveyard.
Nine times out of ten, your monster will get blown up in some way or another, so his effect wouldn't be used unless your opponent has no choice, but to attack.

Crystal Beast Cobalt Eagle (top middle) is one of the support cards for Crystal Beasts to return cards from your Field back to the top of your Deck. It is a Level 4 Wind Monster with 1400 Attack and 800 Defense; however, in most cases, the effect wouldn't be used at all. Crystal Beast Cobalt Eagle's effect is:
  • Once per turn: You can target 1 face-up "Crystal Beast" card you control; return that target to the top of the Deck. If this face-up card is destroyed while it is in a Monster Card Zone, you can place it face-up in your Spell & Trap Card Zone as a Continuous Spell Card, instead of sending it to the Graveyard.
In the strategy, you cannot afford to return a card to the Deck. It causes you to lose advantage and speed with nothing to gain for it. Only use this effect in the rarest of occasions.

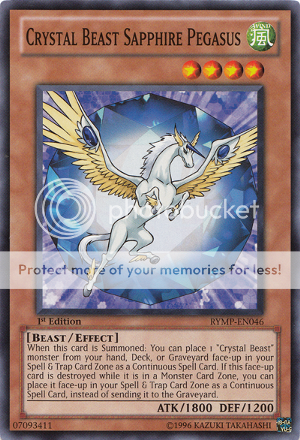
Crystal Beast Sapphire Pegasus (bottom left) is one of the key cards for Crystal Beasts for it to search out your Deck for Crystal Beasts to place in the Spell and Trap Zone. It is a Level 4 Wind Monster with 1800 Attack and 1200 Defense. Crystal Beast Sapphire Pegasus's effect is as follows:
  • When this card is Summoned: You can place 1 "Crystal Beast" monster from your hand, Deck, or Graveyard face-up in your Spell & Trap Card Zone as a Continuous Spell Card. If this face-up card is destroyed while it is in a Monster Card Zone, you can place it face-up in your Spell & Trap Card Zone as a Continuous Spell Card, instead of sending it to the Graveyard.
Crystal Beast Ruby Carbuncle (top right) is one of the key cards for Crystal Beasts for it to Special Summon Crystal Beasts from your Spell and Trap Zone to your Monster Zone. It is a Level 3 Light Monster with 300 Attack and 300 Defense. Crystal Beast Ruby Carbuncle's effect is as follows:
  • When this card is Special Summoned: You can Special Summon as many "Crystal Beast" cards as possible from your Spell & Trap Card Zone. If this face-up card is destroyed while it is in a Monster Card Zone, you can place it face-up in your Spell & Trap Card Zone as a Continuous Spell Card, instead of sending it to the Graveyard.
With this card in combination with Crystal Beast Sapphire Pegasus, you'll have an engine to search out all Crystal Beasts in order to Summon Rainbow Dragon.

For the Normal Spell Card support, there's a few cards that you can activate on your turn and utilize some Crystal Beasts from these cards. These cards are:


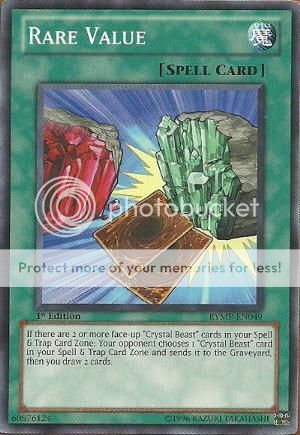
Rare Value (bottom right) is a draw card for Crystal Beasts. Rare Value's effect is as follows:
  • If there are 2 or more face-up "Crystal Beast" cards in your Spell & Trap Card Zone: Your opponent chooses 1 "Crystal Beast" card in your Spell & Trap Card Zone and sends it to the Graveyard, then you draw 2 cards.
Letting your opponent choose what Crystal Beast gets sent to the Graveyard is bad, because with the current strategy that Crystal Beasts have, your opponent will take away more of your speed by sending 1 card from your Field to the Graveyard rather than drawing 2 cards.

Crystal Promise (bottom left) is one way to Special Summon. Crystal Promise's effect is as follows:
  • Target 1 "Crystal Beast" card in your Spell & Trap Card Zone; Special Summon that target.
If Crystal Beast Ruby Carbuncle or Crystal Beast Sapphire Pegasus is in your Spell and Trap Zone, you can use Crystal Promise to Special Summon them from the Spell and Trap Zone to the Monster Zone.

Crystal Beacon (top middle) is another way to Special Summon. Crystal Beacon's effect is as follows:
  • Special Summon 1 "Crystal Beast" monster from your Deck. You must have 2 or more "Crystal Beast" cards in your Spell & Trap Card Zone to activate and to resolve this effect.
Nine times out of ten, you would Special Summon Crystal Beast Ruby Carbuncle and bring out your Crystal Beasts monsters from the Spell and Trap Zones.

Crystal Blessing (top right) returns Crystal Beasts from your Graveyard to the Spell and Trap Zone. Crystal Blessing's effect is as follows:
  • Target up to 2 "Crystal Beast" monsters in your Graveyard; place those targets face-up in your Spell & Trap Card Zone as Continuous Spell Cards.
With this effect, you would try to set up easier Exceed Summoning tactics when you are able to Special Summon Crystal Beast Ruby Carbuncle. Also, Crystal Blessing is used to put Crystal Beast Sapphire Pegasus in the Spell and Trap Zone, and once you Special Summon Crystal Beast Ruby Carbuncle, you can Special Summon the Crystal Beasts that you placed from this effect to the Monster Zones.

Crystal Abundance (top left) is a win condition for Crystal Beasts, because once you are able to use Crystal Abundance's effect throughly, you can kill the opponent by any means necessary. Crystal Abundance's effect is as follows:
  • Send 4 "Crystal Beast" cards from your Spell & Trap Card Zone to the Graveyard; send all cards on the field to the Graveyard, then Special Summon as many "Crystal Beast" monsters as possible from your Graveyard, up to the number of cards your opponent controlled that were sent to the Graveyard by this card's effect.
Pretty much, this can change the game permanently in your favor, once you have 4 Crystal Beast cards in your Spell and Trap Zones. As soon as the damage is done from this card, the only way your opponent can bounce back is if they have a hand trap containing either Battle Fader, Gorz the Emissary of Darkness, or Tragoedia (if their hand gives Tragoedia enough Attack or Defense); however through Exceed Summoning, it's not likely that they'll bounce back.

For the Equip Spell Card support, there's one card from that category shown below:


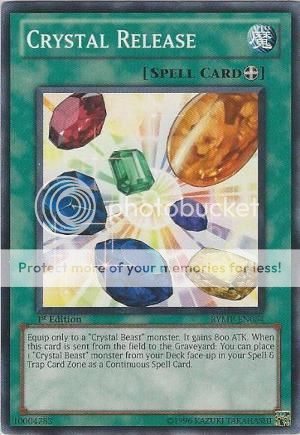
Crystal Release is an Equip Spell which gives Crystal Beasts a nice power boost. Crystal Release's effect is as follows:
  • Equip only to a "Crystal Beast" monster. It gains 800 ATK. When this card is sent from the field to the Graveyard: You can place 1 "Crystal Beast" monster from your Deck face-up in your Spell & Trap Card Zone as a Continuous Spell Card.
With how today's strategies revolve around getting big monsters out, you can use this card in combination with a Crystal Beast Amber Mammoth, Crystal Beast Sapphire Pegasus, or Crystal Beast Topaz Tiger, and you can run over some of your opponent's monsters, and once the Crystal Beast along with Crystal Release is destroyed, you can place 1 Crystal Beast from your Deck to your Spell and Trap Zone along with the Crystal Beast that was destroyed by your opponent.

For the Continuous Spell Card support, there's one card from that category shown below:


Crystal Tree is a Continuous Spell Card that provides Crystal Beasts with more speed if need be; however, in today's cases, it's rarely going to be used except for a deterrent to Mystical Space Typhoon. Crystal Tree's effect is as follows:
  • Each time a "Crystal Beast" monster(s) is placed in either player's Spell & Trap Card Zone: Place 1 Crystal Counter on this card. You can send this card to the Graveyard; take a number of "Crystal Beast" monsters from your Deck equal to the number of Crystal Counters that were on this card, then place those monsters face-up in your Spell & Trap Card Zone as Continuous Spell Cards.
If any Crystal Beast gets placed in the Spell and Trap Zone, you can place 1 Crystal Counter onto this card, which you can send the card to search out Crystal Beasts from your Deck and place them in your Spell and Trap Card Zone as Continuous Spell Cards. In most cases, this card will not be used because the engine Crystal Beast Sapphire Pegasus and Crystal Beast Ruby Carbuncle can provide.

For the Field Spell Card support, there are two cards from that category shown below:


Advanced Dark (left) is a support card that can be used in conjunction with Rainbow Dark Dragon. Advanced Dark's effect is as follows:
  • All "Crystal Beast" monsters on the field or in a Graveyard are DARK-Attribute. The effects of monsters targeted for an attack from "Rainbow Dragon" or "Rainbow Dark Dragon" are negated during the Battle Phase only. During damage calculation, if a "Crystal Beast" monster you control is battling: You can send 1 "Crystal Beast" monster from your Deck to the Graveyard; You take no battle damage from that battle. 
With Advanced Dark's effect, you can have Crystal Beasts be milled from your Deck to your Graveyard, and have other cards be used to bring them out from the Graveyard to the Spell and Trap Zone. Treating all Crystal Beasts as Dark-Attributed can bring some cards to be used within a Crystal Beast deck which require a certain amount of Dark monsters to be within your Graveyard.

Ancient City - Rainbow Ruins (right) is a support card that can be used in conjunction with how many Crystal Beasts are in your Spell and Trap Zones. Ancient City - Rainbow Ruins's effect is as follows:
  • You must have this many "Crystal Beast" cards in your Spell & Trap Card Zone to activate and resolve these effects:
    • 1+: This card cannot be destroyed by card effects.
    • 2+: Once per turn, you can halve the Battle Damage you take.
    • 3+: When a Spell/Trap Card is activated: You can send 1 "Crystal Beast" monster you control to the Graveyard; negate the activation and destroy it.
    • 4+: Once per turn, during your Main Phase: You can draw 1 card.
    • 5+: Once per turn, during your Main Phase: You can target 1 "Crystal Beast" card in your Spell & Trap Card Zone; Special Summon that target.
With how fast Crystal Beasts play with Crystal Beast Sapphire Pegasus and Crystal Beast Ruby Carbuncle, some players can use Ancient City - Rainbow Ruins with no problems. It's a good card, so if you have room for it, put it in.

For the Trap Card support, there's five cards in this category shown below:


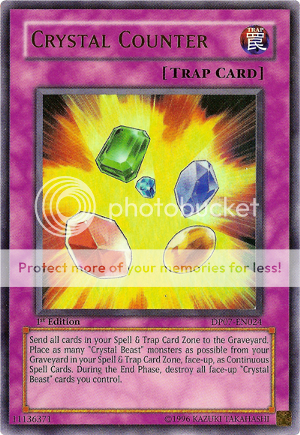
Crystal Counter (top left) can be used to pull out your Crystal Beasts from your Graveyard to your Spell and Trap Zone for a one turn rush. Crystal Counter's effect is as follows:
  • Send all cards in your Spell & Trap Card Zone to the Graveyard. Place as many "Crystal Beast" monsters as possible from your Graveyard in your Spell & Trap Card Zone, face-up, as Continuous Spell Cards. During the End Phase, destroy all face-up "Crystal Beast" cards you control.
In order to use this effect, you would have to not set anything else during that turn, which can lead to your opponent getting some free shots in, or if you decide on using some chainable traps (or use hand traps), then the worry goes away and you still have your protection during that turn.

Crystal Pair (top middle) can be used as protection from your opponent's attacks during that turn only. Crystal Pair's effect is as follows:
  • When a "Crystal Beast" monster you control is destroyed by battle and sent to the Graveyard: Place 1 "Crystal Beast" monster from your Deck face-up in your Spell & Trap Card Zone as a Continuous Spell Card, then you take no Battle Damage for the rest of this turn.
It's basically a searcher plus battle damage negator; however, the downside is you have to let a Crystal Beast go to the Graveyard, and you have to take battle damage for that battle. Not a very useful card.

Crystal Raigeki (top right) can be used as a chain to such cards as Mystical Space Typhoon or Heavy Storm. Crystal Raigeki's effect is as follows:
  • Send 1 "Crystal Beast" card from your Spell & Trap Card Zone to the Graveyard to target 1 card your opponent controls; destroy that target.
The downside is that some cards benefit from the destruction of other cards and some cards can negate the destruction of a card (Stardust Dragon, for example), so there's not much use for this card, other than you can make sure your opponent wastes a card or two.

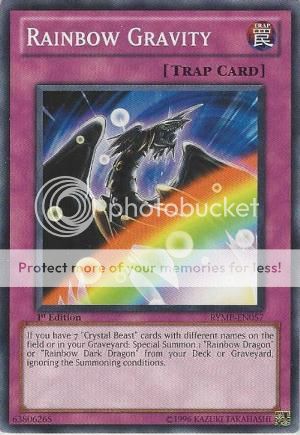
Rainbow Gravity (bottom left) is strictly Rainbow Dragon or Rainbow Dark Dragon support for Crystal Beasts. Rainbow Gravity's effect is as follows:
  • If you have 7 "Crystal Beast" cards with different names on the field or in your Graveyard: Special Summon 1 "Rainbow Dragon" or "Rainbow Dark Dragon" from your Deck or Graveyard, ignoring the Summoning conditions.
Pretty much, you can use this card to Special Summon Rainbow Dragon or Rainbow Dark Dragon from your Deck or your Graveyard if you have 7 different Crystal Beasts within your Graveyard.; however, there's not much room for strictly Rainbow Dragon support in a casual build or a competitive build, so it's not used.

Rainbow Path (bottom right) is a searcher for Rainbow Dragon or Rainbow Dark Dragon. Rainbow Path's effect is as follows:
  • When an opponent's monster declares an attack: Send 1 "Crystal Beast" card from your Spell & Trap Card Zone to the Graveyard to target the attacking monster; negate the attack, then you can add 1 "Rainbow Dragon" or "Rainbow Dark Dragon" from your Deck to your hand.
Again, another Rainbow Dragon or Rainbow Dark Dragon support card for Crystal Beasts only, so it's not going to be used in a casual build or a competitive build.